Apple Mac Pro 2006 Repair and Upgrade
PROJECT:
13
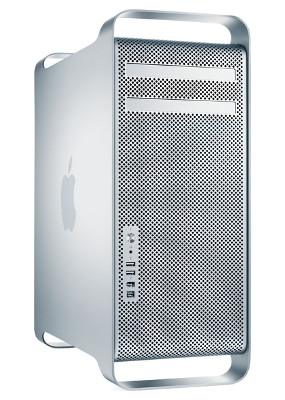
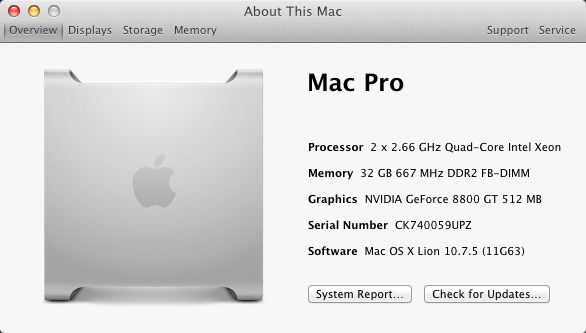
Contained in another cheap Ebay job-lot was a 2006 Apple Mac Pro. The Mac Pro was Apple's top of the line and fastest range of PC's aimed at professionals. In 2006 their possible specs were rather impressive with dual Intel Xeon multi-core processors, up to 32GB ECC memory and facility for up to 2TB of storage. Essentially this was server class hardware in a professional workstation. This particular Mac Pro however was a poorly treated example of the base 1,1 model. It was a quad-core machine consisting of two Intel Xeon 2.66GHz 5150 processors, 1GB memory, Nvidia GeForce 7300GT graphics and a 250GB SATA hard disk. It was in a bit of a state and constantly over-heating and rebooting. Fortunately in 2018 spare parts for these machines are fairly cheap and readily available.
Fixing the Mac Pro
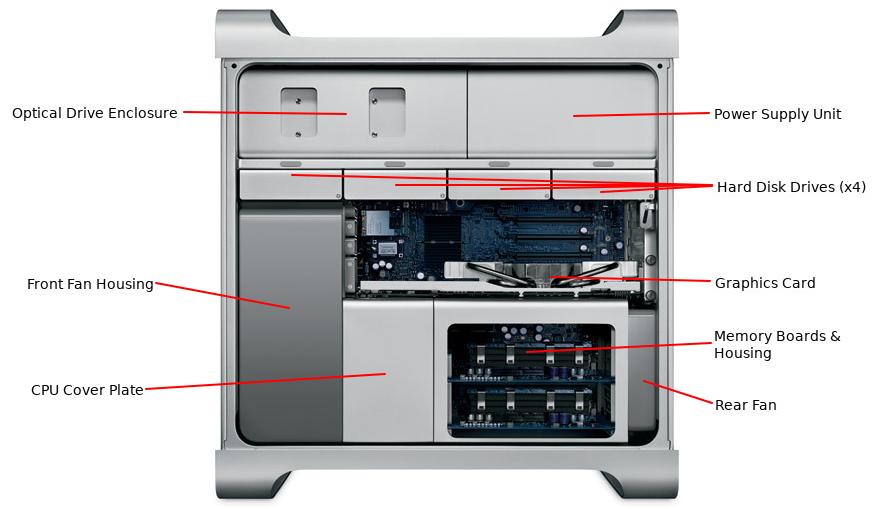
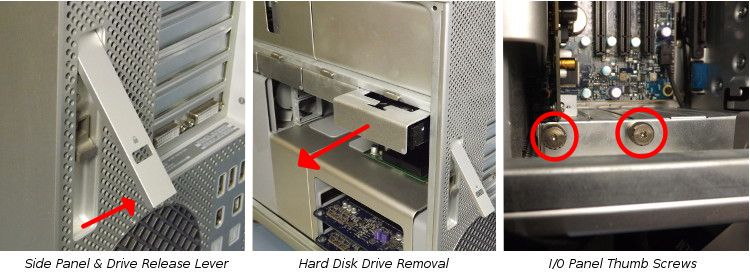
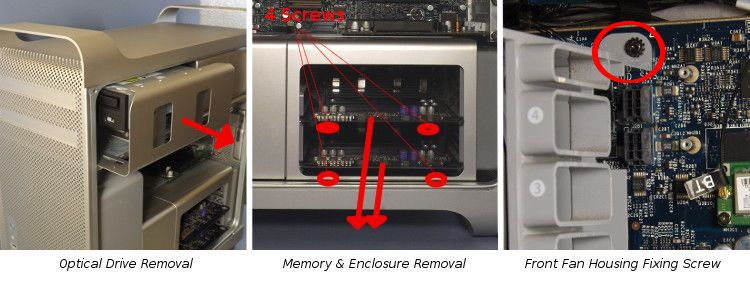
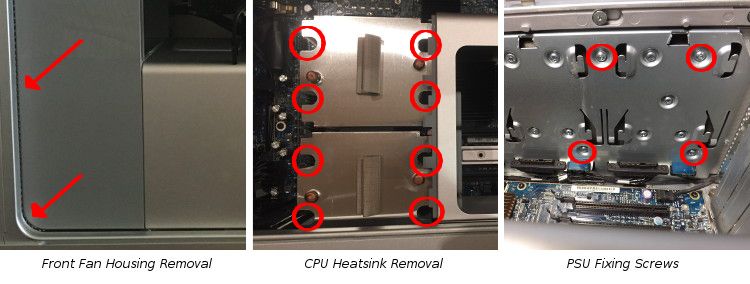
It was quickly determined that the overheating was caused by poor air flow and insufficient cooling due to the inside of the PC being completely clogged with years of dust and pet hair. There were balls of dust bunnies throughout the inside and the CPU heatsinks were compacted with crud. The memory daughter boards have diagnostic LED's on them and one was lit indicating an issue with one of the two 512MB DDR2 modules. This was likely the cause of the rebooting issue. Removing the DIMM module, cleaning the contacts and the socket removed the lit LED, but before trying to reboot the PC again it needed a full strip down and clean. There are many Mac Pro tear down guides already on the internet so I am not going to go into too much detail on how to strip down the computer for a full clean, but here are the main bullet points;
With all the parts removed they were given a thorough cleaning and then the computer was re-assembled. Before being upgraded the Mac Pro was fully tested and was found to fully functional except for the optical drive. The overheating issue was resolved just by giving it a thorough clean. Re-seating the memory module also fixed the re-booting issue.
Simple Upgrades
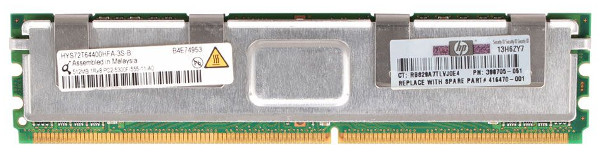
Memory is probably the easiest part to upgrade. The DIMM modules are fitted to 2 daughter-boards, 4 modules in each, which slide out of the case for easy access. The 2006 / 2007 (1,1 / 2,1) models use ECC Fully Buffered DDR2 667MHz DIMM modules which must be fitted in pairs as it is dual channel. Original Apple memory is relatively cheap but old server memory is even cheaper. I was able to purchase 8x 4GB sticks of PC2-5300F FB-DIMM HP server memory for £24, giving this Mac Pro a massive 32GB. Wi-Fi and Bluetooth can easily be added as there are sockets on the motherboard for plugging in add-on modules. The Mac Pro can take Apple Airport Wi-Fi modules and Apple Bluetooth modules. They simply plug into the motherboard and are retained with a few small screws. The Wi-Fi and bluetooth antennas are already built in to the case and their respective cables can be found tucked away between the hard drive cables. The Apple Airport modules are rather expensive and I will be using the Gigabit LAN for networking so I did not bother with Wi-Fi.
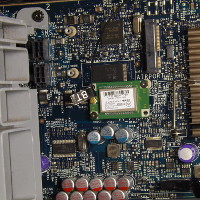
Bluetooth though is quite useful, particularly for adding wireless input devices like keyboards and mice. The Mac Pro uses the A1115 module (Part no. 820-1696-A) which was also used on the iMac G5. Strangely when searching Ebay ones advertised for the Mac Pro ranged between £10-£15, but the ones advertised for the iMac G5 were cheaper. I managed to pick one up for £2.99 with free delivery and install in the Mac Pro.
The SATA-II hard disks are also easy to upgrade as they are installed on sliding mounts which simply pull out of the case. Officially the Mac Pro is capable of using up to 500GB hard disks per bay, which makes a total of 2TB storage. As 500GB SATA II hard disks are cheap I purchased two Hitachi 500GB SATA-II Hard Disks and two Seagate 500GB SATA-II Hard Disks. I bought identical pairs because the Mac Pro supports RAID. Setting up the disks as two separate RAID disks was simple using the OSX Drive Utility built into the Mac OSX 10.6 installer. I set up the first two drives as the main OS drives in striping mode and the other two as data storage drives in mirroring mode for added data security.
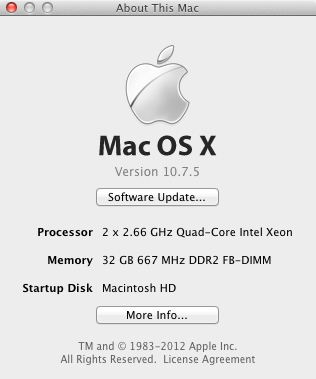
Mac OSX Upgrade
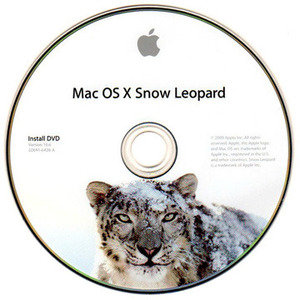
The Mac Pro came pre-installed with Mac OSX 10.5.4 on it's tiny 250GB hard disk. As this was swapped out for 2TB of storage (4 x 500GB) I had to re-install OSX. I have a copy of OSX 10.6 on DVD so used that to install the OS. Upgrading to 10.7.x requires 10.6.6 or newer so I ran the Mac update which gave me 10.6.8. I then tried installing a copy of 10.7.5, which is the last officially supported version of OSX on EFI32 hardware. However, this install failed stating I first require 10.7. So I searched online again and found an ISO image of the OSX 10.7.2 installer. I burned this to a DVD and ran this installer to upgraded to 10.7.2. Then I ran the 10.7.5 installer from within OSX and this time it worked fine. Now I was upgraded with the latest officially supported version of OSX I was able to continue my upgrade process. It is possible to install a modified version of El Capitan (OSX 10.11), but I decided to save that upgrade for later.
CPU Upgrade
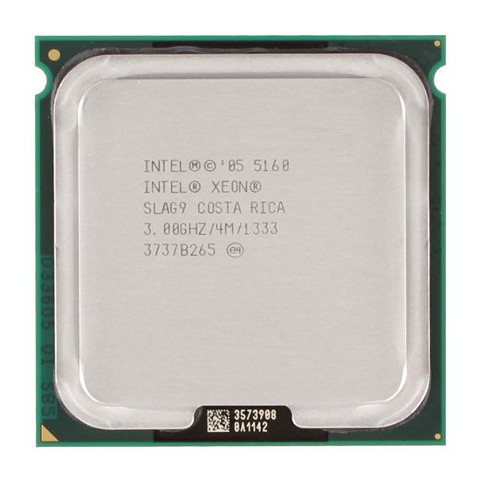
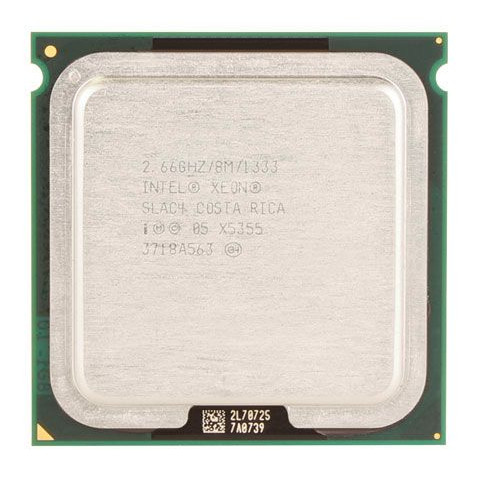
The basic specification Mac Pro 1,1 came with dual Intel Xeon 5150 processors which have 2 cores each and run at 2.66GHz. The only possible upgrade for the 1,1 is the Intel Xeon 5160 which has the same 2 cores running at 3.0GHz. In 2018, Xeon 5160's fetch around £5 each on Ebay and although this would be a very cheap and quick upgrade it only gives about a 12% performance increase. However, the 2,1 model has support for the Intel Xeon 5300 series 4-core CPU's, which have twice as many cores and twice the cache memory. The Xeon 5300 series can also be found very cheap on Ebay for around £10-£15 each. The difference between a Mac Pro 1,1 and the 2,1 is only the firmware and the hardware is identical. Therefore it is possible to easily convert a model 1,1 to a 2,1 and add support for the much faster 4-core processors. Apple part sellers often market these Xeon CPU's as "matched pairs" inferring that they have to be purchased in pairs when being used on dual CPU platforms. Usually these "matched" CPU's come at a premium making you think they have been meticulously tested and carefully selected. In reality though this is complete nonsense. As long as the CPU's are the same specification and have the same SLxxx part number they can be purchased individually and they will work perfectly fine. Also they don't have to be Apple supplied parts. 5300 series CPU's removed from any old server will do just fine (as long as they are working ones that is). The 5365 running at 3.0GHz would be the best upgrade but at the time I could only find one 5365 for sale so I opted for 2x Xeon 5355 2.66GHz parts for £12 each. Adding 2 more cores per CPU at the same frequency is essentially a 100% performance increase, so that would be a worthwhile and cost effective upgrade. So, to use the Xeon 5355 4-core processors on a Mac Pro 1,1 the firmware needed upgrading to 2,1. It was recommended to perform the update with the original 5150's and then change the processors afterwards.
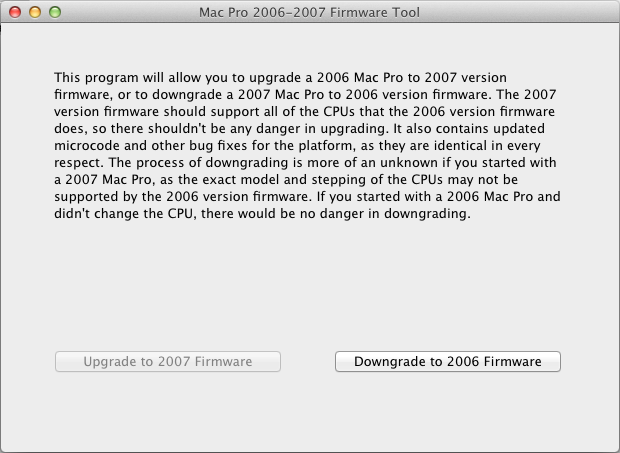
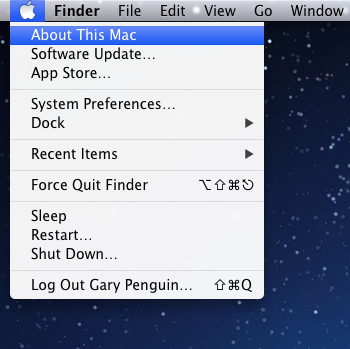
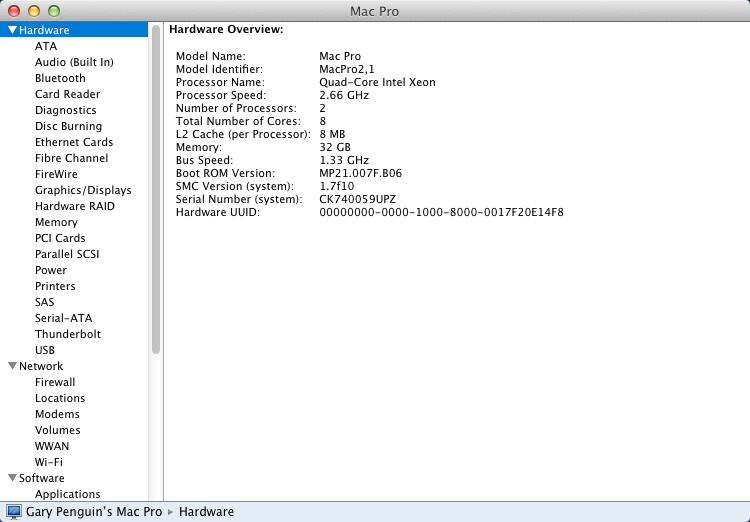
The Mac Pro 2006-2007 Firmware Tool was found on the internet, downloaded onto the Mac for upgrade, unzipped and finally ran the install file. This can only be done on OSX 10.6 or newer, hence why I upgraded OSX from 10.5.4 previously. The tool has a fairly straightforward GUI. I clicked to upgrade the firmware, then reboot the Mac, holding down the power button until the Mac beeps. This completed the update process and rebooted into OSX. To check it has been successful I went into 'About This Mac' in the Apple menu, clicked on 'More Info...', then 'System Report...'.
In the 'Hardware Overview' window it should have 'MacPro2,1' as the 'Model Identifier'.
Graphics Card Upgrade (The cheap way)
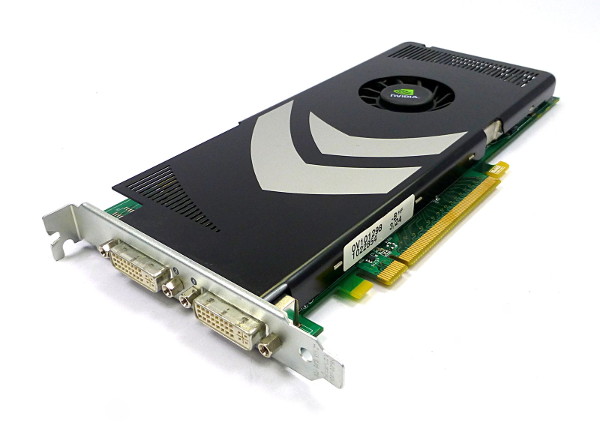
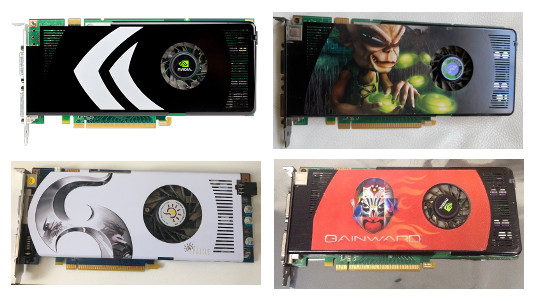
The Mac Pro 1,1 and 2,1 workstations were shipped with the Nvidia GeForce 7300GT graphics card as standard. Whilst being a reasonable card suitable for driving two displays in 2D applications they are not powerful enough for 3D rendering or gaming. Later Mac Pro models were updated to the 8800GT which is a much more capable card and about 10x faster at 3D rendering. Apple versions of these cards are still available, but for a premium. However, the PC equivalent cards are a quarter of the price. The Apple branded parts are identical to their PC counterparts except for the firmware. Firmwares on these Nvidia graphics cards can be easily updated using the NVFlash utility and a suitable PC, therefore standard PC cards can be turned into Apple compatible cards with minimum effort saving quite a lot of money. Apple M88GT32.rom and M88GT64.rom firmware files were easily found on the internet. The xx32.rom file is for 1,1 and 2,1 machines with EFI32 and the xx64.rom for later EFI64 models. These files are only compatible with GeForce 8800GT (and some GTS) graphics cards with the G92 chipset, 512MB VRAM and 1024K ROM chip. Other 8800GT cards with 256, 320 or 640MB VRAM are not compatible, and neither are ones with a 512K ROM chip. A good candidate for the required specification are the Nvidia reference design cards which were available from various brands such as Gainward, POV, Sparkle, XFX, Zotac and Nvidia themselves. It was the Nvidia cards with black heat shield and the double arrow logo which were supplied to Apple. I managed to find one of the Nvidia brand cards on Ebay for £18.95 (£15.00 + £3.95 postage).
To upload these firmware files to the graphics card all you need is a standard PC with a free PCIe X16 2.0 slot, 1GB or larger USB flash drive, the NVFlash utility (DOS version) and Rufus bootable media utility. Using Rufus on a Windows PC, I created a bootable USB drive using the 'FreeDOS' option. I Copied both the NVFlash utility files and the two *.ROM files to the USB Drive. Installed the 8800GT in the PC. It is recommended to remove any existing GPU and install the 8800GT in the primary PCIe X16 slot. It is possible to flash the 8800GT with it installed as a second GPU but is advised only if the primary GPU is NOT Nvidia. Having two Nvidia cards in the system could cause confusion and result in flashing the wrong graphics card. Note: the 8800GT graphics card requires a 6-pin PCIe power connector! I plugged the USB drive into the PC and boot from the USB drive. I had to alter the BIOS boot settings to do this. The PC booted into FreeDOS and displayed a DOS prompt. First of all I checked the card is the correct specification by typing:
at the prompt. This retrieved lots of info about the graphics card. Included in the info was the chipset and the correct chipset is G92. If it says anything other than G92, like G80, then it is not the correct card, but it was. Then I checked the ROM chip size using:
This returned a value of 1024K, which is good. If it does not then the card is not compatible with the Apple firmware. All was good and the card passed the previous two tests so I then made a backup of the existing ROM using the command:
Once the backup completed it was time to flash the card with the Apple ROM using; For EFI32 Mac Pro's (1,1 / 2,1):
For EFI64 Mac Pro's (2008 models or newer):
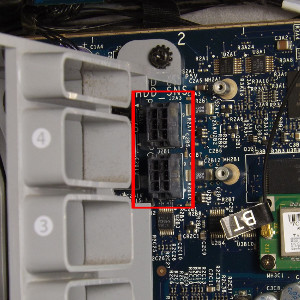
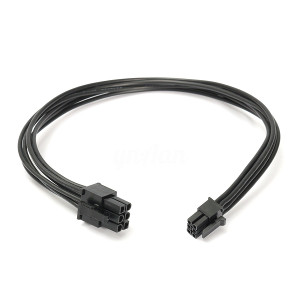
This displayed a warning about differing device ID's and asked to confirm by typing 'YES' and then 'y'. This happened twice. After which it flashed the ROM with the Apple firmware. Once flashed, I rebooted the PC to make sure the graphics card still functions. It booted fine, so it was ready to be used in the Apple Mac Pro. When installing in the Mac Pro the 8800GT required a PCIe 6-pin power cable. There are two small 6-pin connectors on the Mac Pro motherboard which are for connecting PCIe power cables. These cables were readily available off Ebay for a few pounds.
Replacing the 7300GT for the 8800GT does give the Mac Pro 1,1 or 2,1 a huge graphics performance boost. However there are other options like the AMD Radeon HD5770, which is even faster, but I have found compatibility issues with some software. The Nvidia GeForce 8800GT is a good compromise of performance and compatibility for the ageing first generation Mac Pro.
Conclusion The Mac Pro 1,1 does appear to be quite a robust machine and repairs are relatively straightforward. Upgrades too are simple with the modular design and slide out hard disks, optical drives and memory modules. The only draw back with the first generation Mac Pro is the 32-bit EFI BIOS which limits the official OSX upgrade path to 10.7.5. In 2018 10.7.5 is rather outdated and this is clearly demonstrated when trying to use the Safari web browser. However, there are alternatives to Safari such as Chrome, Opera and even Firefox which still support OSX Lion. The total cost of the repair and upgrade is as follows;
Overall this project was a success as the cheaply available parts and hacks have given this Mac Pro a few more years of useful service. Further modifications such as hacking OSX El Capitan to run on EFI32 hardware, addling an SSD or installing Linux should improve it's compatibility and usefulness even further. I may look at this sometime in the future.
|